Hi folks,
Long time no see. So I've put away the WeTab almost for good but then a couple of days ago I got to thinking it could be a nice central system to just spend a few minutes maybe browsing around some cooking videos on youtube in the kitchen. So I got up to my tinkering business again and whaddya know I actually learned something new in the process.
First off I downloaded the latest release of the Android X86 distro which looks like it's some port of the cyanogenmod system.
So previously I had mentioned in some install blog that with USB sticks it is a hit or miss...well apparently it is nothing physical, it's actually just a silly magic set of bytes that needs to be written someplace on the USB stick. I found this out when I started getting an Error 17 (or was it Error 7, I forget). In any case, according to these nice people at the WeTab community the USB stick needs to have that written somewhere in the first 400 bytes or so.
I finally managed to write the code on to the stick but not with the printf examples I found on-line.
Instead I opened up Hexfiend and created a file with the sole 4 bytes I needed: 9d 2a 44 7b
I named the file test.bin and then used dd to write the code where it has to go.
I'm not sure if I was just running into some silliness on my part but I was doing this on a mac and apparently there are two ways to refer to the physical device, either raw by /dev/rdisk2 or some other layered way with /dev/disk2.
Of course this needs to be done only after you've figured out what the proper path is to your USB stick by running
hdutil list
Anyhow, once you have that test.bin file created, you can then DD it to the write spot on the USB stick boot record.
sudo dd if=test.bin of=/dev/disk2 bs=1 seek=440
Use hexdump then to ensure that you see those 4 bytes where they ought to have gone:
sudo hexdump -s 440 -n 4 /dev/disk2
First impression is I like this better than Windows on the WeTab because of the lesser performance hit. But it looks like the video rendering drivers are whacked. I still have to look around a bit to see if that's something that can easily be fixed with some boot setting. Well, enough tinkering for now, enjoy cracking open your old junk closet and digging the WeTab out :)
Monday, July 20, 2015

Monday, May 27, 2013
Wetab reloaded
Hey there everyone. I apologize for the long absence, I've noticed this little blog really did actually come in handy to some people out there and for this I am glad. To those whom sent me but never received a response, I am truly sorry.
I had given up a bit on the wetab seeing as how hot this little tablet can get. The fan blows out the heat from the vents and after a while it could get pretty uncomfortable if you're using it as a tablet. In fact, I started using it as though it were a laptop with a touch screen which was somewhat ok. This worked out best when I bought a a cover-keyboard for it:
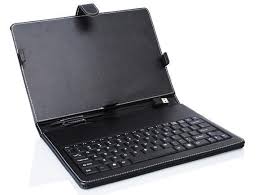


This really helped make the tablet somewhat useful in the past year or so. But as work picked up the pace, this gizmo went into the dark corners of oblivion and I just simply didn't pick it up anymore. Although, whenever I did and started using it again, it felt awfully nice to be able to just point and click on the screen and drag windows around.
Anyhow, today I went back and decided to crack it open again. I had seen the Windows 8 touch-screen laptops lying around in every electronics shop I've visited in the past year or so, flaunting their so-called novelty at the hapless consumer. I figured, why not see how it fairs on the Wetab. I had gone through a few websites here and there and many talk about installing Windows 8 on the ExoPC.
First, as most resources indicate, you will need to get a USB version of the Windows 8 ISO. To do this you will need to download the Microsoft Tool for doing this here.
You will then need to install this on any Windows machine you have lying around and feed it your Windows 8 ISO to create the bootable Windows 8 USB disk.
Once you have this, you are set to go. If you think you might like to go back to your old system in the future, then first load up your Wetab system and attach an external USB with enough space to copy your whole storage for backup.
You can then run the following dd command:
dd if=/dev/sda of=/media/USBWhatever/wetab-bakup.img bs=4096
That will take a bit of time, maybe around 20 minutes.
Now to install Windows 8, I advise using Plop boot to get your Wetab to boot from your USB drive. Although on the Wetab website (and also on this blog elsewhere), it is written that you can actually boot directly from the USB by doing some evasive combination of things (quicktouch while holding down power as soon as the blue led comes on), this has proven to be quite frustrating and only occasionally effective at best. Therefore, I truly advise you to download Plop Boot manager here, install it, and use it to select the USB option at start up after you load into plop boot manager.
One thing to note is that plop for some reason doesn't really recognize your Keyboard or anything so you will have to make do with single-clicks on the quicktouch button to toggle between options and a long-click-hold on the quicktouch button to select the option you want.
Finally, having installed plop boot, attach your Windows 8 USB drive, reboot and boot into Plop. Select USB from the menu and follow along the Windows 8 installation screens. The rest seems to be quite mundane. You shouldn't have to worry about the drivers as Windows 8 seems to pickup everything on the Wetab including the touchscreen and wireless device.
I haven't had much time to play with it but if I get to try something interesting, I'll be sure to post. And of course if you have new and interesting ideas to share, please share!
I had given up a bit on the wetab seeing as how hot this little tablet can get. The fan blows out the heat from the vents and after a while it could get pretty uncomfortable if you're using it as a tablet. In fact, I started using it as though it were a laptop with a touch screen which was somewhat ok. This worked out best when I bought a a cover-keyboard for it:


This really helped make the tablet somewhat useful in the past year or so. But as work picked up the pace, this gizmo went into the dark corners of oblivion and I just simply didn't pick it up anymore. Although, whenever I did and started using it again, it felt awfully nice to be able to just point and click on the screen and drag windows around.
Anyhow, today I went back and decided to crack it open again. I had seen the Windows 8 touch-screen laptops lying around in every electronics shop I've visited in the past year or so, flaunting their so-called novelty at the hapless consumer. I figured, why not see how it fairs on the Wetab. I had gone through a few websites here and there and many talk about installing Windows 8 on the ExoPC.
First, as most resources indicate, you will need to get a USB version of the Windows 8 ISO. To do this you will need to download the Microsoft Tool for doing this here.
You will then need to install this on any Windows machine you have lying around and feed it your Windows 8 ISO to create the bootable Windows 8 USB disk.
Once you have this, you are set to go. If you think you might like to go back to your old system in the future, then first load up your Wetab system and attach an external USB with enough space to copy your whole storage for backup.
You can then run the following dd command:
dd if=/dev/sda of=/media/USBWhatever/wetab-bakup.img bs=4096
That will take a bit of time, maybe around 20 minutes.
Now to install Windows 8, I advise using Plop boot to get your Wetab to boot from your USB drive. Although on the Wetab website (and also on this blog elsewhere), it is written that you can actually boot directly from the USB by doing some evasive combination of things (quicktouch while holding down power as soon as the blue led comes on), this has proven to be quite frustrating and only occasionally effective at best. Therefore, I truly advise you to download Plop Boot manager here, install it, and use it to select the USB option at start up after you load into plop boot manager.
One thing to note is that plop for some reason doesn't really recognize your Keyboard or anything so you will have to make do with single-clicks on the quicktouch button to toggle between options and a long-click-hold on the quicktouch button to select the option you want.
Finally, having installed plop boot, attach your Windows 8 USB drive, reboot and boot into Plop. Select USB from the menu and follow along the Windows 8 installation screens. The rest seems to be quite mundane. You shouldn't have to worry about the drivers as Windows 8 seems to pickup everything on the Wetab including the touchscreen and wireless device.
I haven't had much time to play with it but if I get to try something interesting, I'll be sure to post. And of course if you have new and interesting ideas to share, please share!
Thursday, September 1, 2011
Twofing Acceleration/Easing
I've found Philip Merk's twofing daemon to be quite a useful feature to have running on the Wetab. I've occasionally had some beef with the acceleration and easing feature where I'm always overshooting the point in the document that I am trying to scroll to simply because the thing won't stop scrolling. Also sometimes it thinks that I'm doing a quick flick when all I'm doing is removing my two fingers from the screen.
A quick patch helped remove the ease effect. Open up gesture.c and do a find on startEasing. Comment that line out and recompile and install. You won't get the easing effect any more. I'm not sure if I will be content with this, the easing and acceleration helped me get through long scrolling adventures but I've also had a few frustrated experiences where I just can't get it to stop scrolling once I've reached the point I want. We'll see how things go from here on.
I'm also enjoying a different layout with the Cairo-docks panels, that along with the metacity composite manager give a nice look and feel for things. Also I've found that opening up the system fonts and cranking those up makes all the menus in firefox and all the other apps a lot easier to deal with, what with my clumsy fingers smudging all over the screen.
Over and out.
A quick patch helped remove the ease effect. Open up gesture.c and do a find on startEasing. Comment that line out and recompile and install. You won't get the easing effect any more. I'm not sure if I will be content with this, the easing and acceleration helped me get through long scrolling adventures but I've also had a few frustrated experiences where I just can't get it to stop scrolling once I've reached the point I want. We'll see how things go from here on.
I'm also enjoying a different layout with the Cairo-docks panels, that along with the metacity composite manager give a nice look and feel for things. Also I've found that opening up the system fonts and cranking those up makes all the menus in firefox and all the other apps a lot easier to deal with, what with my clumsy fingers smudging all over the screen.
Over and out.
Thursday, August 25, 2011
Facelifting
I find it very difficult to stick with any one situation or setup for too long. If you ever visit my office at work, you will find me moving my furniture around atleast once every month or two. Well, I grew tired of the regular old ubuntu panels so I went ahead and downloaded Cairo dock from the Ubuntu package manager. I'm liking it so far although it does lack a few essential applets in my opinion; for example, ther is no wifi / network manager plug-in.
You should also know that it will need a composite manager, if you ever need to turn that off, use the gconf-editor (just run the command from a terminal) apps->metacity->general->compositing_manager and uncheck that checkbox to turn the composite manager off. Sometimes I find that these could really hog up resources and knowing how to turn it off comes in handy.
I've also found that using the florence virtual keyboard is much more comfortable, because you can play with its opacity and still see thru it to the windows below. I am though having a bit of a nasty time with these search suggestions that firefox keeps dishing out when I'm trying to fill search forms and other fields; the suggestion box steals the focus from the keyboard and i find myself having to re-type several letters that get dropped off while I'm typing. If anyone figures out how to deal with this please don't hesitate to clue me in!
You should also know that it will need a composite manager, if you ever need to turn that off, use the gconf-editor (just run the command from a terminal) apps->metacity->general->compositing_manager and uncheck that checkbox to turn the composite manager off. Sometimes I find that these could really hog up resources and knowing how to turn it off comes in handy.
I've also found that using the florence virtual keyboard is much more comfortable, because you can play with its opacity and still see thru it to the windows below. I am though having a bit of a nasty time with these search suggestions that firefox keeps dishing out when I'm trying to fill search forms and other fields; the suggestion box steals the focus from the keyboard and i find myself having to re-type several letters that get dropped off while I'm typing. If anyone figures out how to deal with this please don't hesitate to clue me in!
Friday, August 12, 2011
Gabriel Knight on WeTab Dosbox finally useable
So I finally got that Gabriel Knight game to be useable on the Wetab with Dosbox. I must say that it took a good day of debugging through the doxbox mouse.cpp file but eventually I got myself an ok solution though I have no idea how extensible it is.
This post by Yushatak really helped get my exploratory juices running again:
http://vogons.zetafleet.com/viewtopic.php?t=27360&postdays=0&postorder=asc&start=0
So according to this post all I needed was to set emulate=0 inside the mouse.cpp file for dosbox, recompile and everything would work atleast in fullscreen.
Well further down the post Yushatak does make note of this not being universally effective. It appears that games under DOS did all sorts of weird stuff with the mouse coordinates.
First off I had to set autolock to false inside my dosbox.conf file. That atleast got the touchscreen to interact with the game. But what would happen was that the first screen with the Intro and the game selection menu my mouse worked perfectly however, on the first scene in the game where you start in St. George's bookshop the mouse would do some very funky stuff where if you clicked anywhere near the top of the screen the clicks were fine. While when you moved down to the bottom, the cursor moved slower than your finger as you moved down the screen.
I eventually ended up adding a few tens of printf statements to view the values of the mouse coordinates throughout the CursorMoved function and found that at some point after the Sierra intro screen and the actual game, the game would somehow reset the mouse.max_y value to 155 instead of 199 as it was on the first screen where everything worked normally. Now I followed this through and there is some sort of fraction that identifies where the mouse really is and that is multiplied by the max_y value to identify where the cursor will end up on the screen. So that explains why the cursor was moving with a varying rate as you moved down the screen...the percentage offset was changing on 0-155 pixel range while your finger was working through a 0-199 finger range. This probably sounds like gibberish but it's as close an analysis as I can come up with at the moment.
Anyhow by hardcoding mouse.max_y=199 into my mouse.cpp, I've gotten the game to behave correctly in gameplay. Now this only works in Windowed mode. In fullscreen my mouse cursor just goes and sits in the right lower corner of the screen and won't budge. For now I will be satisfied with the windowed mode though fullscreen would have really been my preference.
Below is the debug stuff along with the patch I added to mouse.cpp to get this to work. This file is under the src/ints folder in the dosbox source package.
This post by Yushatak really helped get my exploratory juices running again:
http://vogons.zetafleet.com/viewtopic.php?t=27360&postdays=0&postorder=asc&start=0
So according to this post all I needed was to set emulate=0 inside the mouse.cpp file for dosbox, recompile and everything would work atleast in fullscreen.
Well further down the post Yushatak does make note of this not being universally effective. It appears that games under DOS did all sorts of weird stuff with the mouse coordinates.
First off I had to set autolock to false inside my dosbox.conf file. That atleast got the touchscreen to interact with the game. But what would happen was that the first screen with the Intro and the game selection menu my mouse worked perfectly however, on the first scene in the game where you start in St. George's bookshop the mouse would do some very funky stuff where if you clicked anywhere near the top of the screen the clicks were fine. While when you moved down to the bottom, the cursor moved slower than your finger as you moved down the screen.
I eventually ended up adding a few tens of printf statements to view the values of the mouse coordinates throughout the CursorMoved function and found that at some point after the Sierra intro screen and the actual game, the game would somehow reset the mouse.max_y value to 155 instead of 199 as it was on the first screen where everything worked normally. Now I followed this through and there is some sort of fraction that identifies where the mouse really is and that is multiplied by the max_y value to identify where the cursor will end up on the screen. So that explains why the cursor was moving with a varying rate as you moved down the screen...the percentage offset was changing on 0-155 pixel range while your finger was working through a 0-199 finger range. This probably sounds like gibberish but it's as close an analysis as I can come up with at the moment.
Anyhow by hardcoding mouse.max_y=199 into my mouse.cpp, I've gotten the game to behave correctly in gameplay. Now this only works in Windowed mode. In fullscreen my mouse cursor just goes and sits in the right lower corner of the screen and won't budge. For now I will be satisfied with the windowed mode though fullscreen would have really been my preference.
Below is the debug stuff along with the patch I added to mouse.cpp to get this to work. This file is under the src/ints folder in the dosbox source package.
void Mouse_CursorMoved(float xrel,float yrel,float x,float y,bool emulate) {
printf("=====ENTER CUSRORMOVED====\n");
    printf("xrel is %f\n", xrel);
    printf("yrel is %f\n", yrel);
    printf("mouse.pixelPerMickey_x is %f\n", mouse.pixelPerMickey_x);
    printf("mouse.pixelPerMickey_y is %f\n", mouse.pixelPerMickey_y);
    printf("mouse.mickey x is %f \n",mouse.mickey_x);
    printf("mouse.mickey y is %f \n",mouse.mickey_y);


    printf("mouse.senv x is %f \n",mouse.senv_x);
    printf("mouse.senv y is %f \n",mouse.senv_y);
    printf("mouse. x is %f \n",mouse.x);
    printf("mouse. y is %f \n",mouse.y);
    printf("x is %f \n",x);
    printf("y is %f \n",y);

    printf("INITIALIZATION COMPLETE\n");
    float dx = xrel * mouse.pixelPerMickey_x;
    float dy = yrel * mouse.pixelPerMickey_y;

    printf("$> dx = xrel * mouse.pixelPerMickey_x = > %f = %f * %f\n",dx,xrel,mouse.pixelPerMickey_x);

    printf("$> dy = yrel * mouse.pixelPerMickey_y = > %f = %f * %f\n",dy,yrel,mouse.pixelPerMickey_y);

    if((fabs(xrel) > 1.0) || (mouse.senv_x < 1.0)) dx *= mouse.senv_x;
    if((fabs(yrel) > 1.0) || (mouse.senv_y < 1.0)) dy *= mouse.senv_y;

    if (useps2callback) dy *= 2;


    printf("mouse.mickey_x +=dx\n");
    printf("mouse.mickey_y +=dy\n");

    mouse.mickey_x += dx;
    mouse.mickey_y += dy;

    printf("mouse.mickey x is %f \n",mouse.mickey_x);
    printf("mouse.mickey y is %f \n",mouse.mickey_y);
    printf("dx is %f \n",dx);
    printf("dy is %f \n",dy);
    printf("mouse. x is %f \n",mouse.x);
    printf("mouse. y is %f \n",mouse.y);
    printf("x is %f \n",x);
    printf("y is %f \n",y);

emulate=0;
    if (emulate) {
        printf("  ==Inside emulate\n");

        printf("  mouse.x +=dx\n");
        printf("  mouse.x +=dy\n");
        mouse.x += dx;
        mouse.y += dy;
        printf("    currently x is %f \n",mouse.x);
        printf("    currently y is %f \n",mouse.y);
    } else {
        if (CurMode->type == M_TEXT) {
            printf("    ==Inside Curmode test\n");
            mouse.x = x*CurMode->swidth;
            mouse.y = y*CurMode->sheight * 8 / CurMode->cheight;

            printf("      currently CurMode->swidth is %f \n",CurMode->swidth);
            printf("      currently CurMode->sheight is %f \n",CurMode->sheight);
            printf("      currently CurMode->cheight is %f \n",CurMode->cheight);
            printf("      currently mouse.x is %f \n",mouse.x);
            printf("      currently mouse.y is %f \n",mouse.y);


        } else if ((mouse.max_x < 2048) || (mouse.max_y < 2048) || (mouse.max_x != mouse.max_y)) {
            printf("    ==Curmode else ((mouse.max_x < 2048) || (mouse.max_y < 2048) || (mouse.max_x != mouse.max_y))\n");
            if ((mouse.max_x > 0) && (mouse.max_y > 0)) {
                printf("    ==if(mouse.max_x > 0) && (mouse.max_y > 0)\n");

                mouse.max_y = 199;
                printf("      just set mouse.max_y is %i \n",mouse.max_y);

                printf("      currently mouse.max_x is %i \n",mouse.max_x);
                printf("      currently mouse.max_y is %i \n",mouse.max_y);
                printf("      currently mouse.x is %f \n",mouse.x);
                printf("      currently mouse.y is %f \n",mouse.y);
                printf("      currently x is %f \n",x);
                printf("      currently y is %f \n",y);


                printf("  $>  mouse.x = x*mouse.max_x %f\n",x*mouse.max_x);
                printf("  $>  mouse.y = y*mouse.max_y %f\n",y*mouse.max_y);
                mouse.x = x*mouse.max_x;
                mouse.y = y*mouse.max_y;

            } else {
                printf("    ==else(mouse.max_x > 0) && (mouse.max_y > 0)\n");
                printf("      $>  mouse.x += xrel\n");
                printf("      $>  mouse.y += yrel\n");
                printf("      currently mouse.x is %f \n",mouse.x);
                printf("      currently mouse.y is %f \n",mouse.y);


                mouse.x += xrel;
                mouse.y += yrel;


                printf("      currently mouse.x is %f \n",mouse.x);
                printf("      currently mouse.y is %f \n",mouse.y);
            }
        } else { // Games faking relative movement through absolute coordinates. Quite surprising that this actually works..
            printf("    ==Curmode else faking relative motion\n");

            mouse.x += xrel;
            mouse.y += yrel;

            printf("      $>  mouse.x += xrel\n");
            printf("      $>  mouse.y += yrel\n");

            printf("      currently mouse.x is %f \n",mouse.x);
            printf("      currently mouse.y is %f \n",mouse.y);
        }
    }

    /* ignore constraints if using PS2 mouse callback in the bios */

    if (!useps2callback) {
        printf("==useps2callback\n");
        if (mouse.x > mouse.max_x) mouse.x = mouse.max_x;
        if (mouse.x < mouse.min_x) mouse.x = mouse.min_x;
        if (mouse.y > mouse.max_y) mouse.y = mouse.max_y;
        if (mouse.y < mouse.min_y) mouse.y = mouse.min_y;
        printf("      currently mouse.x is %f \n",mouse.x);
        printf("      currently mouse.y is %f \n",mouse.y);
    }

//mouse.y = mouse.y+50;
printf("===END CURMOVED===\n");

    Mouse_AddEvent(MOUSE_HAS_MOVED);
    DrawCursor();
}
Friday, June 10, 2011
Wishings for a Guitar App
I've been craving the touch of my guitar for a while now...only it's not so practical to carry it around with all the travels I've had to do lately. If I happen to find some time, I would like to build a little app on the wetab that basically does what google so cooly did on their front page the other day (some flash applet that treats your mouse movement as though you were strumming a guitar when you hover over the guitar strings).But I wouldn't know where to start. I haven't done much GUI programming at all. I've seen some really easy to code python apps, but then again I don't know if that would be fast enough to make it fun. Well, just a thought I doubt I'll find the time to actually do this. But if you've stumbled across something like this I would welcome a comment to direct me to it :)
Tuesday, June 7, 2011
Rotating WeTab Screen on Natty Narwhal
So the rotation bit turned out to be simpler than I had thought and thanks to the following link: https://wiki.ubuntu.com/X/InputCoordinateTransformation I've gotten it working.
So as before I have two scripts: rot.sh and norm.sh
rot.sh looks like this:
norm.sh looks like this:
If I were awake in Linear Algebra class I would probably have realized the solution a lot earlier. In any case the first line basically represents something like the following matrix which in essence rotates the coordinate system by 90 degrees to the left. The details slip me at present but I'm sure I'll dream of matrices tonight...
0 -1 1
1 0 0
0 0 1
Alrighty, over and out!
So as before I have two scripts: rot.sh and norm.sh
rot.sh looks like this:
xinput set-prop 9 --type=float "Coordinate Transformation Matrix" 0 -1 1 1 0 0 0 0 1
xrandr -o left
norm.sh looks like this:
xinput set-prop 9 --type=float "Coordinate Transformation Matrix" 1 0 0 0 1 0 0 0 1
xrandr -o normal
If I were awake in Linear Algebra class I would probably have realized the solution a lot earlier. In any case the first line basically represents something like the following matrix which in essence rotates the coordinate system by 90 degrees to the left. The details slip me at present but I'm sure I'll dream of matrices tonight...
0 -1 1
1 0 0
0 0 1
Alrighty, over and out!
Natty Narwhal Installed
This will be a shorter post. I updated my Ubuntu install to Natty Narwhal and a bunch of things sort of broke. One was the multi-touch, if I did a two finger scroll now, touch completely stops working. I later realized that it is actually the GINN daemon kicking in and taking over the clicks but not letting go of them so if you're scrolling, you can scroll up and down for ever but you can't get back your single clicks. To remedy this I went ahead and disabled GINN from the Startup Applications applet and re-enabled twofing. I've also updated to twofing 9a, see this link regarding this: https://help.ubuntu.com/community/T101MT
The other problem I'm working on right now is the rotation. It looks like the configuration I had described in my earlier posts doesn't apply anymore. You have to set a Transformation Matrix for the coordinate system. I haven't had enough time to sort it out yet but I will post the details as soon as I have that figured out. Other than those two things, my system seems fine, and I think it's running slightly faster actually :)
The other problem I'm working on right now is the rotation. It looks like the configuration I had described in my earlier posts doesn't apply anymore. You have to set a Transformation Matrix for the coordinate system. I haven't had enough time to sort it out yet but I will post the details as soon as I have that figured out. Other than those two things, my system seems fine, and I think it's running slightly faster actually :)
Wednesday, April 6, 2011
twofing double click bug solved
Hey there,
So even though nobody else was complaining about twofing double-clicking when it should only be single clicking, I've gone ahead and assumed that twofing is to blame. I messed around with my drivers but everything seemed ok.
So, I popped open gestures.c and looked through it. I added some debug prints at each of the fingerdown if statements and noticed that when I ran in debug mode (twfing --debug), nothing out of the ordinary was happening...
I press once and the finger down boolean switches to 1, when I lift my finger, the boolean goes back to zero...but two clicks appear to reach gnome. I remembered reading in the twofing doc that for interactions with non-special windows clicks are passed off to x...but the code on lines 509 to 516 looked suspicious:
So the comments there didn't make much sense to me but I went ahead and removed the last two statements which basically sent a (additional) mouse click.
Ran make and launched twofing and lo and behold no more double clicks for my single-click touches. Now I still need to run with this patch a little longer to confirm that it doesn't break anything but so far everything seems to be just perfecto...!
So even though nobody else was complaining about twofing double-clicking when it should only be single clicking, I've gone ahead and assumed that twofing is to blame. I messed around with my drivers but everything seemed ok.
So, I popped open gestures.c and looked through it. I added some debug prints at each of the fingerdown if statements and noticed that when I ran in debug mode (twfing --debug), nothing out of the ordinary was happening...
I press once and the finger down boolean switches to 1, when I lift my finger, the boolean goes back to zero...but two clicks appear to reach gnome. I remembered reading in the twofing doc that for interactions with non-special windows clicks are passed off to x...but the code on lines 509 to 516 looked suspicious:
  else if (fingersDown == 0 && fingersWereDown > 0) {
        /* Last finger released */
        if (hadTwoFingersOn == 0 && !isButtonDown()) {
            /* The button press time has not been reached yet, and we never had two
             * fingers on (we could not have done this in this short time) so
             * we simulate button down and up now. */

            pressButton();
            releaseButton();
So the comments there didn't make much sense to me but I went ahead and removed the last two statements which basically sent a (additional) mouse click.
Ran make and launched twofing and lo and behold no more double clicks for my single-click touches. Now I still need to run with this patch a little longer to confirm that it doesn't break anything but so far everything seems to be just perfecto...!
Monday, April 4, 2011
About twofing
Hey there. Haven't really had time to do this post but I'll dump a bunch of information here which I basically ripped off of this link: http://www.dadenjo.de/blog/wetabinstallationvonkubuntu
I'm going to assume that you have Ubuntu running on your WeTab and have configured the Multitouch driver properly as I've explained in earlier posts.
Now, download the latest twofing package...I worked with this one: https://help.ubuntu.com/community/T101MT?action=AttachFile&do=get&target=twofing-0.0.7.tar.gz
Unpack it somewhere and have alook at its content.
Install some needed libraries:
Now open up the file 70-touchscreen-egalax.rules and change the Product ID to match the device ID you get from your lsusb output.
Finally run "make"
and then "sudo make install"
Now start twofing: twofing
If you want to run twofing at startup use the --wait flag in your call. (twofing --wait )
So now you should be able to do some fun stuff like using twofinger to scroll up and down and so on. To be honest I haven't had much use for it really, especially because it converts all single finger touches to double-clicks which annoyed the heck out of me, but occasionally it will be useful if I need to use the mouse roller (brightness applet for ubuntu doesn't seem to work any other way...). I considered modifying the code to remove the double-click "feature" but then I didn't have that much time on my hands.
Cheers!
I'm going to assume that you have Ubuntu running on your WeTab and have configured the Multitouch driver properly as I've explained in earlier posts.
Now, download the latest twofing package...I worked with this one: https://help.ubuntu.com/community/T101MT?action=AttachFile&do=get&target=twofing-0.0.7.tar.gz
Unpack it somewhere and have alook at its content.
Install some needed libraries:
sudo apt-get install build-essential libx11-dev libxtst-dev libxi-dev x11proto-randr-dev libxrandr-dev
Now open up the file 70-touchscreen-egalax.rules and change the Product ID to match the device ID you get from your lsusb output.
SYSFS{idProduct}=="72a1"
Finally run "make"
and then "sudo make install"
Now start twofing: twofing
If you want to run twofing at startup use the --wait flag in your call. (twofing --wait )
So now you should be able to do some fun stuff like using twofinger to scroll up and down and so on. To be honest I haven't had much use for it really, especially because it converts all single finger touches to double-clicks which annoyed the heck out of me, but occasionally it will be useful if I need to use the mouse roller (brightness applet for ubuntu doesn't seem to work any other way...). I considered modifying the code to remove the double-click "feature" but then I didn't have that much time on my hands.
Cheers!
Saturday, March 12, 2011
so far so good with Ubuntu
so far I'm finding Ubuntu a lot nicer to deal with, I know I promised to explain how to get twofing to work...I'll get to it soon. I actually haven't found it so useful. In fact what turned out to be really great was the Okular reader. it allows you to drag the pages with the left mouse button and opens pdfs, cbz, cbr...you name it. And to install it you just use the ubuntu package center.
you may also want to make sure you're running with the ubuntu desktop setup and not the netbook layout because that was torture...to get that done you must logout and select a user to login as and at the bottom there should be a selection box to switch to the regular old ubuntu interface.
Rotating the screen as described in one of my earlier posts makes the reading experience better, except the hardware leaves a lot to be desired where the display is concerned.
You will likely find the mouse pointer a pain...i've changed that with a little bullseye png i made and turned into a cursor using xgencursor:

just create a file called target.cursor and add the following:
32 16 16 target.png
to make the hotspot of the cursor be the center. Now run:
$>xcursorgen target.cursor default
you should end up with a file called default containing your new cursor, it took a bit of time to figure out where to put it to get it picked up. I can't recall exactly where i placed it but what i did was i found the folder containing the files for my current theme, backed up the cursor file. replaced it and restarted.
Cheers from the midst of the Cairo revolution!
you may also want to make sure you're running with the ubuntu desktop setup and not the netbook layout because that was torture...to get that done you must logout and select a user to login as and at the bottom there should be a selection box to switch to the regular old ubuntu interface.
Rotating the screen as described in one of my earlier posts makes the reading experience better, except the hardware leaves a lot to be desired where the display is concerned.
You will likely find the mouse pointer a pain...i've changed that with a little bullseye png i made and turned into a cursor using xgencursor:
just create a file called target.cursor and add the following:
32 16 16 target.png
to make the hotspot of the cursor be the center. Now run:
$>xcursorgen target.cursor default
you should end up with a file called default containing your new cursor, it took a bit of time to figure out where to put it to get it picked up. I can't recall exactly where i placed it but what i did was i found the folder containing the files for my current theme, backed up the cursor file. replaced it and restarted.
Cheers from the midst of the Cairo revolution!
Thursday, March 3, 2011
Upgrading the touchscreen firmware to 1.006h
So I've been having some really ugly experiences with the touchscreen where it doesn't regsiter my touch in a lot of instances. I've just upgraded the firmware to 1.006h following the details described here:
http://www.wetab-community.com/index.php?/topic/12962-neuste-firmware-des-touchscreens-unter-weos-installieren/page__st__20
You will have to do this from inside the WeOs because I'm not sure where to get the eUpgrade tool, maybe it comes with the egalax drivers...anyhow that's not our concern at this point.
First, make sure you have a USB Keyboard and Mouse handy.
Now, open up a shell and
$>cd Downloads
$>wget http://www.exopc.com/backstage/download/Support/TouchPanel_YFO_v1006h.zip
$>sudo unzip TouchPanel_YFO_v1006h.zip -d /usr/share/tiitoo/firmware/
$>eUpgrade -f /usr/share/tiitoo/firmware/YoungFast_11p6_24x43_72A1v1006h_f04_dsab_ASG.EGXP
Now you will see something like:
eUpgrade -f /usr/share/tiitoo/firmware/YoungFast_11p6_24x43_72A1v1006h_f04_dsab_ASG.EGXP
If fortune does not side with you then you can always revert to the older firmware which you should find under the same folder: /usr/share/tiitoo/firmware/YoungFast_11p6_24x43_72A1v1005...
Best of luck, if you worried about doing this wait for the official update...!
http://www.wetab-community.com/index.php?/topic/12962-neuste-firmware-des-touchscreens-unter-weos-installieren/page__st__20
You will have to do this from inside the WeOs because I'm not sure where to get the eUpgrade tool, maybe it comes with the egalax drivers...anyhow that's not our concern at this point.
First, make sure you have a USB Keyboard and Mouse handy.
Now, open up a shell and
$>cd Downloads
$>wget http://www.exopc.com/backstage/download/Support/TouchPanel_YFO_v1006h.zip
$>sudo unzip TouchPanel_YFO_v1006h.zip -d /usr/share/tiitoo/firmware/
$>eUpgrade -f /usr/share/tiitoo/firmware/YoungFast_11p6_24x43_72A1v1006h_f04_dsab_ASG.EGXP
Now you will see something like:
*) EETI firmware upgrade tool version: 1.03.1011

 **** DO NOT TOUCH THE SCREEN DURING RUNNING!! ****

 (I) Found a PCAP device on /dev/hidraw0
 (I) Model: PCAP72A1
 (I) Type: PCAP7200 Series
 (I) Version: 1.005f

 (I) Image file [/usr/share/tiitoo/firmware/YoungFast_11p6_24x43_72A1v1006h_f04_dsab_ASG.EGXP]: Opened
 (I) Load image file: OK
 (I) Waiting............
and then pinnwand will restart. DO NOT PANIC IF THE TOUCHSCREEN DOES NOT REACT TO YOUR TOUCH. Just do the eupgrade one more time, this is what happened with me,eUpgrade -f /usr/share/tiitoo/firmware/YoungFast_11p6_24x43_72A1v1006h_f04_dsab_ASG.EGXP
If fortune does not side with you then you can always revert to the older firmware which you should find under the same folder: /usr/share/tiitoo/firmware/YoungFast_11p6_24x43_72A1v1005...
Best of luck, if you worried about doing this wait for the official update...!
Sunday, February 27, 2011
More about the touchsceen and multitouch
Hey everybody,
So for the longest time I had things a bit switched up in my mind, I talked about multitouch and enabling the touchcreen as though they were one and the same...but they're not. Merely enabling the touchscreen allows the OS to register the "touch" events, mainly where you clicked and a mouse click...multitouch says that you've used more than one finger and thus two/three locations would be registeted instead.
In my post about installing ubuntu I don't make much of a distinction, in fact I used the terms interchangeably. All that changed when my friend Reiner told me about twofing, which basically captures multitouch events and does special things with particular windows such as scroll forward in evince if you swipe two fingers acoss the screen.
Well first off et me describe how to get the multitouch driver installed. Please note that if you had gotten the touchscreen to work using the method described in the Ubuntu installation post, you will need to undo these changes...namely remove the usbhid.quirks changes to the GRUB file and remove the 99-calibration.conf file rom /etc/X11/xorg.conf.d/
Next you will need to make sure you have added the utouch-team repository to the ubuntu packager (you may not need the unstable repo anymore)
sudo add-apt-repository ppa:utouch-team/utouch
sudo add-apt-repository ppa:utouch-team/unstable
sudo apt-get upgrade
sudo apt-get update
Next, download the egalax drivers:
sudo apt-get install hid-egalax-dkms
You should now be good to go. Restart the machine. For some reason I was getting weird behavior on my first restart and had to manually shut down the machine by holding down the power button. But the next time it loaded up it was fine...so in case you run in to any problems...restart again, if it persists across more restarts then you have a different issue.
Now if you recall, we had rotation scripts...well those won't work anymore, atleast not the way they are at the moment. Instead your files should now look like so:
#normal.sh
#!/bin/sh
xrandr -o normal
xinput set-int-prop 9 "Evdev Axes Swap" 8 0
xinput set-int-prop 9 "Evdev Axis Calibration" 32 0 32760 0 32760
xinput set-int-prop 10 "Evdev Axes Swap" 8 0
xinput set-int-prop 10 "Evdev Axis Calibration" 32 0 32760 0 32760
-----------------------------------------------
# rot.sh
#!/bin/sh
xrandr -o left
xinput set-int-prop 9 "Evdev Axes Swap" 8 1
xinput set-int-prop 9 "Evdev Axis Calibration" 32 32760 0 0 32760
xinput set-int-prop 10 "Evdev Axes Swap" 8 1
xinput set-int-prop 10 "Evdev Axis Calibration" 32 32760 0 0 32760
It took me a bit to figure out the settings, but basically it looks like the hid-egalax driver granulates the screen differently (and possibly with different scales depending on what axis).
You should now be running with multitouch support and at the same point where the ubuntu installation post left off.
The next bit just explains where the coordinates above came from. If you're not interested in that, well then you're done and can go enjoy!
If you run xinput_calibrator you will get some output that looks like:
Warning: multiple calibratable devices found, calibrating last one (eGalax Inc. USB TouchController)
use --device to select another one.
Calibrating EVDEV driver for "eGalax Inc. USB TouchController" id=10
current calibration values (from XInput): min_x=0, max_x=32760 and min_y=0, max_y=32760
Doing dynamic recalibration:
Setting new calibration data: -29, 32920, 387, 32606
Now I'm mainly interested in the bolded line, it tells us what the default values for the perfectly functional landscape setup is. The new calibration is ok, but you will find that it isn't perfect.
Ok so let's cut that up, it seems to say that in landscape mode, the lower left corner of the screen is at coordinates (min_x,min_y) which is (0,0).
What about the max? That's our upper right corner of the screen, (max_x,max_y) which is (32760,32760).
So the calibration string with min_x, max_x, min_y, max_y will be:
0 32760 0 32760
Ok, well what happens when we rotate the screen. Well we need to set the new lower left corner of our screen but using the same coordinate system as before. So our screen's origin (new lower-left corner) is now where (32760,0) used to be and the new upper right corner is at (0,32760) thus the new calibration string with min_x, max_x, min_y, max_y will be:
32760 0 0 32760
Well that's all folks. Next time I will explain how I got twofing to work.
Cheers!
So for the longest time I had things a bit switched up in my mind, I talked about multitouch and enabling the touchcreen as though they were one and the same...but they're not. Merely enabling the touchscreen allows the OS to register the "touch" events, mainly where you clicked and a mouse click...multitouch says that you've used more than one finger and thus two/three locations would be registeted instead.
In my post about installing ubuntu I don't make much of a distinction, in fact I used the terms interchangeably. All that changed when my friend Reiner told me about twofing, which basically captures multitouch events and does special things with particular windows such as scroll forward in evince if you swipe two fingers acoss the screen.
Well first off et me describe how to get the multitouch driver installed. Please note that if you had gotten the touchscreen to work using the method described in the Ubuntu installation post, you will need to undo these changes...namely remove the usbhid.quirks changes to the GRUB file and remove the 99-calibration.conf file rom /etc/X11/xorg.conf.d/
Next you will need to make sure you have added the utouch-team repository to the ubuntu packager (you may not need the unstable repo anymore)
sudo add-apt-repository ppa:utouch-team/utouch
sudo add-apt-repository ppa:utouch-team/unstable
sudo apt-get upgrade
sudo apt-get update
Next, download the egalax drivers:
sudo apt-get install hid-egalax-dkms
You should now be good to go. Restart the machine. For some reason I was getting weird behavior on my first restart and had to manually shut down the machine by holding down the power button. But the next time it loaded up it was fine...so in case you run in to any problems...restart again, if it persists across more restarts then you have a different issue.
Now if you recall, we had rotation scripts...well those won't work anymore, atleast not the way they are at the moment. Instead your files should now look like so:
#normal.sh
#!/bin/sh
xrandr -o normal
xinput set-int-prop 9 "Evdev Axes Swap" 8 0
xinput set-int-prop 9 "Evdev Axis Calibration" 32 0 32760 0 32760
xinput set-int-prop 10 "Evdev Axes Swap" 8 0
xinput set-int-prop 10 "Evdev Axis Calibration" 32 0 32760 0 32760
-----------------------------------------------
# rot.sh
#!/bin/sh
xrandr -o left
xinput set-int-prop 9 "Evdev Axes Swap" 8 1
xinput set-int-prop 9 "Evdev Axis Calibration" 32 32760 0 0 32760
xinput set-int-prop 10 "Evdev Axes Swap" 8 1
xinput set-int-prop 10 "Evdev Axis Calibration" 32 32760 0 0 32760
It took me a bit to figure out the settings, but basically it looks like the hid-egalax driver granulates the screen differently (and possibly with different scales depending on what axis).
You should now be running with multitouch support and at the same point where the ubuntu installation post left off.
The next bit just explains where the coordinates above came from. If you're not interested in that, well then you're done and can go enjoy!
If you run xinput_calibrator you will get some output that looks like:
Warning: multiple calibratable devices found, calibrating last one (eGalax Inc. USB TouchController)
use --device to select another one.
Calibrating EVDEV driver for "eGalax Inc. USB TouchController" id=10
current calibration values (from XInput): min_x=0, max_x=32760 and min_y=0, max_y=32760
Doing dynamic recalibration:
Setting new calibration data: -29, 32920, 387, 32606
Now I'm mainly interested in the bolded line, it tells us what the default values for the perfectly functional landscape setup is. The new calibration is ok, but you will find that it isn't perfect.
Ok so let's cut that up, it seems to say that in landscape mode, the lower left corner of the screen is at coordinates (min_x,min_y) which is (0,0).
What about the max? That's our upper right corner of the screen, (max_x,max_y) which is (32760,32760).
So the calibration string with min_x, max_x, min_y, max_y will be:
0 32760 0 32760
Ok, well what happens when we rotate the screen. Well we need to set the new lower left corner of our screen but using the same coordinate system as before. So our screen's origin (new lower-left corner) is now where (32760,0) used to be and the new upper right corner is at (0,32760) thus the new calibration string with min_x, max_x, min_y, max_y will be:
32760 0 0 32760
Well that's all folks. Next time I will explain how I got twofing to work.
Cheers!
Saturday, February 26, 2011
Screen Rotation with Ubuntu on WeTab
Update 26 OCT 2011:
If you're running Ubuntu 11+ please check out this post instead: http://wetabz.blogspot.com/2011/06/rotating-wetab-screen-on-natty-narwhal.html
======================================
So holding up the WeTab for long periods of time can be a pain. Sometimes it seems that holding it up on it's side might be more comfortable, especially when you're lying down in bed and trying to read something.
well as it so happens, you can rotate the screen using xrandr. You might not like what you see but atleast you have the option.
Well first do an xinput -list to see the devices you can interact with to fix up calibration through a script:
xinput -list
⎡ Virtual core pointer id=2 [master pointer (3)]
⎜ ↳ Virtual core XTEST pointer id=4 [slave pointer (2)]
⎜ ↳ eGalax Inc. USB TouchController id=9 [slave pointer (2)]
⎜ ↳ eGalax Inc. USB TouchController id=10 [slave pointer (2)]
⎜ ↳ eGalax Inc. USB TouchController id=11 [slave pointer (2)]
⎜ ↳ ImPS/2 Generic Wheel Mouse id=15 [slave pointer (2)]
⎜ ↳ Microsoft Mouse id=16 [slave pointer (2)]
⎣ Virtual core keyboard id=3 [master keyboard (2)]
↳ Virtual core XTEST keyboard id=5 [slave keyboard (3)]
↳ Power Button id=6 [slave keyboard (3)]
↳ Video Bus id=7 [slave keyboard (3)]
↳ Power Button id=8 [slave keyboard (3)]
↳ USB 2.0 Camera id=12 [slave keyboard (3)]
↳ Asus Laptop extra buttons id=13 [slave keyboard (3)]
↳ AT Translated Set 2 keyboard id=14 [slave keyboard (3)]
↳ Microsoft Keyboard id=17 [slave keyboard (3)]
Note the ids for "eGalax Inc. USB TouchController"
As a quick test to check which device really is the one we need to calibrate we can take each of the ids and plug it in to the following command and then touch the screen with a finger, if the Axes seem to be inverted, we know we have the right device:
xinput set-int-prop 9 "Evdev Axes Swap" 8 1
xinput set-int-prop 10 "Evdev Axes Swap" 8 1
xinput set-int-prop 11 "Evdev Axes Swap" 8 1
Once you know which device id is the right one (mine was 10), you can restore the proper axes by switching the 1 to a 0:
xinput set-int-prop 10 "Evdev Axes Swap" 8 0
you should now create the following scripts that will help you rotate and restore your view.
#rot.sh
#!/bin/sh
xrandr -o left
xinput set-int-prop 10 "Evdev Axes Swap" 8 1
xinput set-int-prop 10 "Evdev Axis Calibration" 32 4052 36 35 4156
#norm.sh
#!/bin/sh
xrandr -o normal
xinput set-int-prop 10 "Evdev Axes Swap" 8 0
xinput set-int-prop 10 "Evdev Axis Calibration" 32 -5 4100 59 4100
* remember to change the device id 10 to whatever works for you. I describe next what to do about the calibrations.
Finally make sure you download and install xinput_calibrator: http://www.freedesktop.org/wiki/Software/xinput_calibrator (the debian package should do).
Now do a xrandr -o left and run the xinput_calibrator. The output should be the calibration parameters that you place on the last command of both scripts (evdev axis calibration).
Finally run the scripts and enjoy the proper calibrations of both landscape and portrait viewing on your WeTab!
UPDATE 26 FEB 2011:
---------------------------------------
The above instructions will work only if you are running with single-touch, to enable multitouch and have rotation work correctly please see: http://wetabz.blogspot.com/2011/02/more-about-touchsceen-and-multitouch.html
If you're running Ubuntu 11+ please check out this post instead: http://wetabz.blogspot.com/2011/06/rotating-wetab-screen-on-natty-narwhal.html
======================================
So holding up the WeTab for long periods of time can be a pain. Sometimes it seems that holding it up on it's side might be more comfortable, especially when you're lying down in bed and trying to read something.
well as it so happens, you can rotate the screen using xrandr. You might not like what you see but atleast you have the option.
Well first do an xinput -list to see the devices you can interact with to fix up calibration through a script:
xinput -list
⎡ Virtual core pointer id=2 [master pointer (3)]
⎜ ↳ Virtual core XTEST pointer id=4 [slave pointer (2)]
⎜ ↳ eGalax Inc. USB TouchController id=9 [slave pointer (2)]
⎜ ↳ eGalax Inc. USB TouchController id=10 [slave pointer (2)]
⎜ ↳ eGalax Inc. USB TouchController id=11 [slave pointer (2)]
⎜ ↳ ImPS/2 Generic Wheel Mouse id=15 [slave pointer (2)]
⎜ ↳ Microsoft Mouse id=16 [slave pointer (2)]
⎣ Virtual core keyboard id=3 [master keyboard (2)]
↳ Virtual core XTEST keyboard id=5 [slave keyboard (3)]
↳ Power Button id=6 [slave keyboard (3)]
↳ Video Bus id=7 [slave keyboard (3)]
↳ Power Button id=8 [slave keyboard (3)]
↳ USB 2.0 Camera id=12 [slave keyboard (3)]
↳ Asus Laptop extra buttons id=13 [slave keyboard (3)]
↳ AT Translated Set 2 keyboard id=14 [slave keyboard (3)]
↳ Microsoft Keyboard id=17 [slave keyboard (3)]
Note the ids for "eGalax Inc. USB TouchController"
As a quick test to check which device really is the one we need to calibrate we can take each of the ids and plug it in to the following command and then touch the screen with a finger, if the Axes seem to be inverted, we know we have the right device:
xinput set-int-prop 9 "Evdev Axes Swap" 8 1
xinput set-int-prop 10 "Evdev Axes Swap" 8 1
xinput set-int-prop 11 "Evdev Axes Swap" 8 1
Once you know which device id is the right one (mine was 10), you can restore the proper axes by switching the 1 to a 0:
xinput set-int-prop 10 "Evdev Axes Swap" 8 0
you should now create the following scripts that will help you rotate and restore your view.
#rot.sh
#!/bin/sh
xrandr -o left
xinput set-int-prop 10 "Evdev Axes Swap" 8 1
xinput set-int-prop 10 "Evdev Axis Calibration" 32 4052 36 35 4156
#norm.sh
#!/bin/sh
xrandr -o normal
xinput set-int-prop 10 "Evdev Axes Swap" 8 0
xinput set-int-prop 10 "Evdev Axis Calibration" 32 -5 4100 59 4100
* remember to change the device id 10 to whatever works for you. I describe next what to do about the calibrations.
Finally make sure you download and install xinput_calibrator: http://www.freedesktop.org/wiki/Software/xinput_calibrator (the debian package should do).
Now do a xrandr -o left and run the xinput_calibrator. The output should be the calibration parameters that you place on the last command of both scripts (evdev axis calibration).
Finally run the scripts and enjoy the proper calibrations of both landscape and portrait viewing on your WeTab!
UPDATE 26 FEB 2011:
---------------------------------------
The above instructions will work only if you are running with single-touch, to enable multitouch and have rotation work correctly please see: http://wetabz.blogspot.com/2011/02/more-about-touchsceen-and-multitouch.html
Maximimized Onboard keyboard problem
So while messing around with the onboard keyboard I double-clicked it's top bar by mistake and ended up with the keyboard totally covering my screen. To further complicate things, in UNR, the maximize/close/minimize buttons are hidden, so there is basically no way to change the size of the onboard window once it is maximized.
After a good hour or so of tinkering I fell upon this discussion:
https://answers.launchpad.net/onboard/+question/127746
So basically all you need to do is use a normal keyboard to launch gconf-editor from a terminal and then go under /apps/Onboard and change the Height and Width settings and relaunch onboard and it should be fine from then on.
One mistake I did make was I had su-ed and was configuring the wrong profile, which prolonged my confirming the solution.
debb1046 mentioned twofing which should allow you to use two fingers to scroll and do some fancy multitouch things with ubuntu (I believe you have to make sure you install the ppa/utouch).
Cheers
After a good hour or so of tinkering I fell upon this discussion:
https://answers.launchpad.net/onboard/+question/127746
So basically all you need to do is use a normal keyboard to launch gconf-editor from a terminal and then go under /apps/Onboard and change the Height and Width settings and relaunch onboard and it should be fine from then on.
One mistake I did make was I had su-ed and was configuring the wrong profile, which prolonged my confirming the solution.
debb1046 mentioned twofing which should allow you to use two fingers to scroll and do some fancy multitouch things with ubuntu (I believe you have to make sure you install the ppa/utouch).
Cheers
Friday, February 25, 2011
WeTab Ubuntu Installation

So I've finally had the time to open up my WeTab again and start fiddling around with it. Actually I had sort of given up on the WeTab a bit, especially after the seeing the Bookman reader on IPad work so beautifully and then comparing that with the readers for WeTab...they don't compare unfortunately. Additionally the performance of the OS leaves a lot to be desired.
In any case, I've made my peace with the WeTab and started caring for it once more. So here without ado, I explain how I went about installing Ubuntu on it.
1- Download the NetBook Remix 10.10 iso (Maverick)
2- Download the Universal Ubuntu USB installer on a windows machine (You could also use Ubuntu to do it, refer to the link I provide below).
3- Download GParted Live (USB version)
4- Make available a USB flash drive, preferably with an LED light
5- USB Mouse and Keyboard (preferably wireless with one receiver to make things easier otherwise you will be doing quite a bit of plugging and inserting)
First off you will need to put GParted on the flash drive (http://gparted.sourceforge.net/liveusb.php#linux-method-b).
Now you should be ready to repartition your WeTab Flash Drive. To do this, connect your USB Flash to the USB port on your WeTab and boot from the USB drive.
To boot from the USB disk is kind of tricky, have a look at the developer page: http://wetab.mobi/en/developers/downloads-and-howtos/
(HowTo – Install WeTab OS with Recovery USB Boot Stick)
Basically you turn on the Wetab and then as soon as you see the blue led in the top left corner light up, press both the power-button and the quicktouch button (top left corner) together for approximately 1 second. It takes a bit of practice to get that just right so don't give up if it doesn't work right away but what should happen then is that your GParted Live should boot up from the USB flash drive.
You can use the quicktouch button on the upper left corner of the WeTab to browse through the Boot menu for Gparted. One touch switches between the option, if you hold down on the quicktouch button, it selects the entry. I chose "other modes of Gparted" and then "Run from RAM or memory", this way you can pull out the USB flash drive once it is done loading up the OS.
Once you're in GParted you will want to started up the GParted application (if it doesn't automatically load up). Select the sda3 partition (the biggest one) and then Resize. My WeTab has 32GB, So I resized mine to allow 8 GB for Ubuntu.
It should take about 15 minutes to resize the partitions.
Once that is done you should create a USB Installer for Ubuntu, just follow the directions on http://www.ubuntu.com/netbook/get-ubuntu/download where it says Create a USB Drive (click show me how).
Again now, just like we had booted up the GParted image off of our USB flash, you should boot up the Ubuntu Installer from the flash drive.
Once it loads up and asks you to Try or Install, choose Install Ubuntu. Follow along on the screens to come. When it asks you where you would like to Install the system, choose "Install along side another OS". At this point you can just let it go on and do it's thing however, the bootloader will be replaced and you will get Ubuntu's GRUB if you reboot. I chose instead the "Manual" option and basically clicked on the unallocated space, created an ext3 partition and marked it as / (root) for Ubuntu to install on it. On the bottom where it asks you where the Bootloader should go, I selected sda4 which is the new partition we created earlier.
Go ahead and Install Ubuntu and then once it is done, restart and go into your original WeTab Os.
You must now modify the extlinux.conf file under /boot/extlinux/extlinux.conf in order to load up Ubuntu.
Add the following lines at the bottom of you extlinux.conf
label Ubuntu
menu label ^Ubuntu
KERNEL chain.c32
APPEND hd0 4
Notice the Append tells extlinux that the logical partition sought for booting is on harddrive 0 and partition 4 (/dev/sda4), where we installed Ubuntu along with it's own GRUB loader.
Next we need to modify the GRUB settings for our Ubuntu installation to enable the touchscreen. Restart the machine and go into your Ubuntu install from the bootup menu (use the quicktouch button to select the Ubuntu install).
Once you are inside Ubuntu, open up a terminal session (click the ubuntu button on the top left corner, type "terminal" in the search bar and then double click the icon when it shows up.
Now to enable the touchscreen we must follow Samiux's and W3C's directions (http://samiux.blogspot.com/2010/07/howto-ubuntu-1004-on-gigabyte-touchnote.html and http://digitalorchard.blogspot.com/2010/12/wetabos-to-pure-meego.html but follow along don't do what is on those pages, I'll cut and paste here).
First off you want to change the GRUB loading parameters as Samiux describes, but you need to follow W3C's advice regarding the correct hexadecimal value to add in. So first do an lsusb:
$>lsusb
Bus 007 Device 001: ID 1d6b:0001 Linux Foundation 1.1 root hub
Bus 006 Device 001: ID 1d6b:0001 Linux Foundation 1.1 root hub
Bus 005 Device 002: ID 04d9:a015 Holtek Semiconductor, Inc.
Bus 005 Device 001: ID 1d6b:0001 Linux Foundation 1.1 root hub
Bus 004 Device 001: ID 1d6b:0001 Linux Foundation 1.1 root hub
Bus 003 Device 002: ID 0eef:72a1 D-WAV Scientific Co., Ltd
Bus 003 Device 001: ID 1d6b:0001 Linux Foundation 1.1 root hub
Bus 002 Device 004: ID 04f2:b213 Chicony Electronics Co., Ltd
Bus 002 Device 003: ID 12d1:1404 Huawei Technologies Co., Ltd.
Bus 002 Device 001: ID 1d6b:0002 Linux Foundation 2.0 root hub
Bus 001 Device 001: ID 1d6b:0002 Linux Foundation 2.0 root hub
note the ID value and place the same values as follows in your GRUB configuration file, Grub 2.o uses a cfg file so go to your /etc/default/grub and modify it to look like the following.
GRUB_CMDLINE_LINUX_DEFAULT="quiet splash i8042.noloop=1 usbhid.quirks=0xeef:0x72a1:0x40"
Finally, you should copy the Xorg calibration files from the original WeTab Os to your Ubuntu install (actually I am not sure if this step is needed):
$>sudo mount /dev/sda1 /mnt/
$> sudo mkdir /etc/X11/xorg.conf.d
$>sudo cp /mnt/etc/X11/xorg.conf.d/99-calibration.conf /etc/X11/xorg.conf.d
Now I will make note also that I had updated my utouch drivers as follows but I believe the above will work regardless, if you have any feedback please post it below. I suggest you try the above first and if it doesn't work, then do the below.
sudo add-apt-repository ppa:utouch-team/utouch
sudo add-apt-repository ppa:utouch-team/unstable
sudo apt-get upgrade
sudo apt-get update
Finally, you should start the virtual keyboard onboard:
$>onboard
You will notice the "onboard" icon on the left toolbar. Right-click the icon and select "Keep in launcher", also open preferences and check "show keyboard when unlocking".
Cheers!
UPDATE 26 FEB 2011:
---------------------------------------
The above installation enables only single touch, to enable multitouch on Ubuntu on WeTab, please see: http://wetabz.blogspot.com/2011/02/more-about-touchsceen-and-multitouch.html
Friday, December 17, 2010
WeTab recovery, BIOS and stuff
Ok so in my previous post I complained loudly about there being no obvious specialness to the BIOS on the WeTab and that all the WeTab-specific shtuff (including the recovery program) existed on the SDD only.
I rescind that statement, I was...sadly...but thankfully....WRONG!
I was having trouble using the Recovery USB-Stick method because the sticks weren't being picked up by the BIOS process. I'm not sure why, I've had that problem consistenly with my WeTab...when I added the Plop boot manager and tried to boot from a USB stick, that same USB would in some cases load up fine and in others give me a kernel panic on boot-up. I'm not sure why that happens, I'm thinking maybe the USB ports are a little off, maybe the metal contacts on the USB-stick are a little worn out, I'm not sure exactly why. Anyhow switching to a different USB-stick with the WeTabRecovery image on it worked fine for me and I was able to recover to the updated image offered on the developers website.
That's actually good news because it means no matter how bad I mess around with the SDD contents, I could always recover without having to break the hardware warranty by opening up the device and taking out the disk (I'm not sure how easy that would have been either).
Regarding the update to the Keyboard, I'm actually liking it except for the fact that the CTRL and SHIFT keys aren't there. The ESC now exists as well as most of the symbols you might need for some scripting/programming, though using the virtual keyboard extendedly is just a pain.
I'm still thinking that ergonomically using tablets is not much fun. Something still feels like it's lacking, looking down at the thing for extended periods of time gives you a crick in the neck. Also if your not sitting up straight the weight of the device gets uncomfortable. And then if your lying down in bed you have to keep your elbows bent to be able to interact with the device. Yes yes, I am a lazy SOB.
So here's an idea of how this can all be mitigated. First we have to eliminate the hand interaction altogether, I always thought the idea of a "touch" device was nice because, well, in some ways it's a much more "personal" experience ( wonder if Jim Morisson was that far ahead with all that LSD, I swear, before I bought that Wetab I could almost hear some of those devices call out to me "come on come on now touch me babe" ). Anyhow so here's the first link:
A couple of years from now and that headset will probably be as comfortable as earphones I suppose.
Now once that is solved we need to do something about the weight of the device. When we were in disneyland about some 15 years ago, I was just dazzled by one the rooms that had had some quite nifty holograms with ghosts flying around in a room that you looked into from the side. Actually if you've seem the Second Iron Man movie they've already thought of that idea, personal computer that threw up a hologramic screen that floated around the room. I guess you could call that invention a Holo-PC.
Well enough day-dreaming for one day.
Hmmm...I wonder what the EFI BIOS looks like and how to mess around with that...I never learn...
I rescind that statement, I was...sadly...but thankfully....WRONG!
I was having trouble using the Recovery USB-Stick method because the sticks weren't being picked up by the BIOS process. I'm not sure why, I've had that problem consistenly with my WeTab...when I added the Plop boot manager and tried to boot from a USB stick, that same USB would in some cases load up fine and in others give me a kernel panic on boot-up. I'm not sure why that happens, I'm thinking maybe the USB ports are a little off, maybe the metal contacts on the USB-stick are a little worn out, I'm not sure exactly why. Anyhow switching to a different USB-stick with the WeTabRecovery image on it worked fine for me and I was able to recover to the updated image offered on the developers website.
That's actually good news because it means no matter how bad I mess around with the SDD contents, I could always recover without having to break the hardware warranty by opening up the device and taking out the disk (I'm not sure how easy that would have been either).
Regarding the update to the Keyboard, I'm actually liking it except for the fact that the CTRL and SHIFT keys aren't there. The ESC now exists as well as most of the symbols you might need for some scripting/programming, though using the virtual keyboard extendedly is just a pain.
I'm still thinking that ergonomically using tablets is not much fun. Something still feels like it's lacking, looking down at the thing for extended periods of time gives you a crick in the neck. Also if your not sitting up straight the weight of the device gets uncomfortable. And then if your lying down in bed you have to keep your elbows bent to be able to interact with the device. Yes yes, I am a lazy SOB.
So here's an idea of how this can all be mitigated. First we have to eliminate the hand interaction altogether, I always thought the idea of a "touch" device was nice because, well, in some ways it's a much more "personal" experience ( wonder if Jim Morisson was that far ahead with all that LSD, I swear, before I bought that Wetab I could almost hear some of those devices call out to me "come on come on now touch me babe" ). Anyhow so here's the first link:
A couple of years from now and that headset will probably be as comfortable as earphones I suppose.
Now once that is solved we need to do something about the weight of the device. When we were in disneyland about some 15 years ago, I was just dazzled by one the rooms that had had some quite nifty holograms with ghosts flying around in a room that you looked into from the side. Actually if you've seem the Second Iron Man movie they've already thought of that idea, personal computer that threw up a hologramic screen that floated around the room. I guess you could call that invention a Holo-PC.
Well enough day-dreaming for one day.
Hmmm...I wonder what the EFI BIOS looks like and how to mess around with that...I never learn...
Wednesday, December 15, 2010
Latest update
So the latest update completely broke my WeTab, probably because of all the mods I had or possibly because it was doing something integral with system *without notifying me and I must have shut it down while it was chugging away. What happened after that was the Pinboard was just flashing like crazy when it loaded up again. A soft reset didn't help.
I wasn't really upto diagnosing so I followed the Developer notes on recovering: http://wetab.mobi/en/developers/. I should add here that if you have trouble with this it may be the USB stick's fault. I had to rummage through a pile of sticks until I could get one that was ok (come to think of it I had to wipe out one of my bigger externals and used that). The directions are pretty clear, you just have to download the recover image, dd that onto your USB (so you should probably keep copies of whatever you had on that stick somewhere else), and then follow the directions (powerbutton + soft touch on startup). It shouldn't take very long to recover the system.
After that I found a nice LiveCD for GParted (http://gparted.sourceforge.net/livecd.php) to repartition the SDD so that I could install Meego (http://digitalorchard.blogspot.com/2010/12/wetabos-to-pure-meego.html).
Please note that if you go ahead with the Meego install it will remove the original bootloader that was on the system and you're then at the mercy of the one installed by Meego (it's extlinux, but it doesn't recognize the soft-touch and it doesn't have the recovery mechanism used by the original WeTab. SO BE SURE TO BACKUP ALL OF /dev/sda before you fool around.
Well. I installed Meego and I learned all of the above the hardway. The thing that scared me the most was when I messed up my booting entry for the WeTab OS while it was the default startup entry, the screen would just sit there and reload and reload, it was as if the booter was reloading itself over and over. Well, I took a bathroom break and came back to try again, the softtouch wasn't being registered at all, so I threw out my last hope...the keyboard, and....it worked! I was able to login to Meego again and fix up my extlinux.conf. Of course before that I was trying like a madman to recover using the directions from the WeTab recovery steps mentioned earlier. I'm sorry but I don't see what they mean by a BIOS if that system really just exists on the frigin disk, it's just a loader. Before I jumped head in I thought that there was some sort of save-your-ass ROM routine that responded to the power+soft button trick for recovery and that the recovery program was some how kept in some safe non-writeable storage. Nope, that is not the case. The only way out of this had I really mucked things up would have been to rip out the harddrive and recover the original image onto it using and external harddrive controller.
Anyhow, I'm not too happy hanging in the wind with the Meego loader. I've decided to burn back my original /dev/sda I had made way back when I wrote the post on backing up (http://wetabz.blogspot.com/2010/10/wetab-backup.html). The way I'm doing this...and I hope it doesn't fail me miserably is that I booted up with the GParted livecd I mentioned earlier and ran the system from RAM (which is nice because then you have a free USB port for the harddrive with the backup image and the other port for the Keyboard without which you can't tell it to do the Restore...dd if=/backup.img of=/dev/sda...
I will write back (well hopefully Iwill), in the event that this fails I will probably be crying like a little girl somewhere for a couple of weeks (well not really, I'll probably be voiding my warranty and playing with my WeTab's internals, I guess I could then try the 2GB trick...ah, the possibilities).
Well apart from all the above, I've forgotten to mention that the new update is actually pretty good. It replaces the old crappy virtual keyboard with a much more functional one, though I still like the look and feel of the matchbox one. And also, finally, you can turn off Automatic Updates and regain your sanity in that respect.
Apart from this I'm still trying to sort out whether I like this gizmo, it's far too bulky to sit comfortably with and it heats up like a mother-father. Well, until later folks, adios!
I wasn't really upto diagnosing so I followed the Developer notes on recovering: http://wetab.mobi/en/developers/. I should add here that if you have trouble with this it may be the USB stick's fault. I had to rummage through a pile of sticks until I could get one that was ok (come to think of it I had to wipe out one of my bigger externals and used that). The directions are pretty clear, you just have to download the recover image, dd that onto your USB (so you should probably keep copies of whatever you had on that stick somewhere else), and then follow the directions (powerbutton + soft touch on startup). It shouldn't take very long to recover the system.
After that I found a nice LiveCD for GParted (http://gparted.sourceforge.net/livecd.php) to repartition the SDD so that I could install Meego (http://digitalorchard.blogspot.com/2010/12/wetabos-to-pure-meego.html).
Please note that if you go ahead with the Meego install it will remove the original bootloader that was on the system and you're then at the mercy of the one installed by Meego (it's extlinux, but it doesn't recognize the soft-touch and it doesn't have the recovery mechanism used by the original WeTab. SO BE SURE TO BACKUP ALL OF /dev/sda before you fool around.
Well. I installed Meego and I learned all of the above the hardway. The thing that scared me the most was when I messed up my booting entry for the WeTab OS while it was the default startup entry, the screen would just sit there and reload and reload, it was as if the booter was reloading itself over and over. Well, I took a bathroom break and came back to try again, the softtouch wasn't being registered at all, so I threw out my last hope...the keyboard, and....it worked! I was able to login to Meego again and fix up my extlinux.conf. Of course before that I was trying like a madman to recover using the directions from the WeTab recovery steps mentioned earlier. I'm sorry but I don't see what they mean by a BIOS if that system really just exists on the frigin disk, it's just a loader. Before I jumped head in I thought that there was some sort of save-your-ass ROM routine that responded to the power+soft button trick for recovery and that the recovery program was some how kept in some safe non-writeable storage. Nope, that is not the case. The only way out of this had I really mucked things up would have been to rip out the harddrive and recover the original image onto it using and external harddrive controller.
Anyhow, I'm not too happy hanging in the wind with the Meego loader. I've decided to burn back my original /dev/sda I had made way back when I wrote the post on backing up (http://wetabz.blogspot.com/2010/10/wetab-backup.html). The way I'm doing this...and I hope it doesn't fail me miserably is that I booted up with the GParted livecd I mentioned earlier and ran the system from RAM (which is nice because then you have a free USB port for the harddrive with the backup image and the other port for the Keyboard without which you can't tell it to do the Restore...dd if=/backup.img of=/dev/sda...
I will write back (well hopefully Iwill), in the event that this fails I will probably be crying like a little girl somewhere for a couple of weeks (well not really, I'll probably be voiding my warranty and playing with my WeTab's internals, I guess I could then try the 2GB trick...ah, the possibilities).
Well apart from all the above, I've forgotten to mention that the new update is actually pretty good. It replaces the old crappy virtual keyboard with a much more functional one, though I still like the look and feel of the matchbox one. And also, finally, you can turn off Automatic Updates and regain your sanity in that respect.
Apart from this I'm still trying to sort out whether I like this gizmo, it's far too bulky to sit comfortably with and it heats up like a mother-father. Well, until later folks, adios!
Thursday, November 25, 2010
WeTab widget icons
the following forum post is full of nice icons for your WeTab apps: http://www.wetab-community.de/forum/viewtopic.php?f=100&t=827
If you want to know how to map icons to apps please have a look at my old post: http://wetabz.blogspot.com/2010/11/wetab-desktop-icons.html
If you want to know how to map icons to apps please have a look at my old post: http://wetabz.blogspot.com/2010/11/wetab-desktop-icons.html
Monday, November 22, 2010
A Break from the WeTab
Well, I'm on a work trip in Helsinki, so I don't have much time to mess around with my WeTab, should be back to my free self in a couple of days.
Subscribe to:
Posts (Atom)